Nov 19, 2013

Stop Motion Studio - one simple app with big results in classrooms

I recently finished teaching Exploring iPads for Teaching and Learning  and I showed the teachers a pretty large collection of apps. I often get K-12 teachers, who teach a variety of topics in my classes so the apps I tend to focus on are ones that can be used in any classroom. This class was no different. I introduced them to the standard apps (Dropbox, ClassDojo, SoundCloud, Educreations...).  Each teacher found a different app that they thought they would use immediately. Lauren Schmitz, who teaches art in our elementary district was fascinated by Stop Motion Studio by CATEATER. She had an idea before I was even done modeling the app.

This is a tool that invokes that kind of reaction from many teachers! For such a simple app, it sure can create amazing results in the classroom. Teachers love the engagement level it creates, along with its ease of use, and students love the ability to create.


So what is Stop Motion Studio? It is an app that allows you to stitch together a collection of still images to create a movie. Sound simple?  It  is. You have the ability to speed up or slow down your animation, and you can even add sound to your animation once you are done capturing your images. I can't believe this app is free. There is an in-app purchase to add more features, but honestly, the free version is amazing.

 Below is a video that Lauren created to model the drawing process on a harvest scene:


I spent an hour in a first grade classroom this week helping them focus on word families. The teacher, Courtney Niemeyer, and I took fifteen minutes to model the activity from start to finish. We then gave partners of students a production board, a collection of letters and an ipad. They did the rest! We discovered that the students not only wanted to create more words than we required, they spoke each word out loud while it was being spelled in the animation!

Here is a quick video I took as the students went around and watched each other's productions:

We will be using this same app to study the concept of motion later in the week.

I have been doing stop motion projects in classroom for a number of years with digital cameras and computers. I have to say that this method takes so much less time and creates the same results. Kudos to the teachers for exploring the use of this technology in the classroom and kudos to Cateater for allowing the app to be free!

Nov 3, 2013

Using Google Doc Story Builder in TILT Staff Development

This past week in my TILT (Teachers Integrating & Learning Technology) staff development program, I had teachers use Google Doc Story Builder in an opening activity. Each teacher had to create a dialog that involved technology (some forgot that parameter, which is okay).  Once we shared our stories, we debriefed this activity by brainstorming ways we could use this tool, either in a teacher directed or student centered activity.

Some ideas we came up with:
  1. Introduce a concept prior to starting a lesson
  2. Have dialogue between characters in a story - prediction
  3. Have dialogue between characters in a story - change the plot
  4. Add parts of speech into a given sentence to enhance its flavor
  5. Dialog between geometric shapes 
  6. Providing steps in a process
  7. Bringing science or math objects to life to explain their purpose
  8. Review of a concept prior to a quiz or test
The teachers had a lot of fun experimenting with this tool. Check out some their work:
Bobbi
Linda
Nicole

Check out Google Doc Story Builder and share your story with us! 


Sep 15, 2013

Putting Your Books On the Big Screen

So many teachers have tubs filled with single books they read aloud to their students, and the students love it! But as the children sit on the carpet looking at that single book, some just can't see. The solution is easy; put your book on the big screen! Here is how I did it (I completed four books in about an hour):

First, Digitize the Pages of Your Book
I started this process by using my scanner, but I soon learned that it just took too long. My solution?

My iPad with my tripod adapter! I mentioned this adapter in my post "Where Does Your Spending Money Go?"


I used my kitchen table and a place mat for a solid background. I then snapped pictures of the pages. I took the pictures with two facing pages instead of each page individually. I was thinking I might want to add my audio file to this book eventually and often the "turn page" prompt is after two pages.

I zoomed in on my pages as close as I could so that I wouldn't have to do a lot of cropping.


Next, Send Pictures to your Computer
I used the Photosync app to send my pictures over to my Mac. 

 
I love this app! It lets you transfer your photos and videos to any other device with Photosync installed, so I can share amongst all my devices as well as share with anyone else that has this app. 

I can also transfer to other sources like Dropbox, Picasa, Flickr or other FTP sites (FTP stands for File Transfer Protocol).


Then, Create a Presentation with Your Pages
I went with PowerPoint. I could have used other tools, but I thought this was the fastest tool to create the big screen book for me. I had to do a little cropping with some of the pages, but for the most part, I simply inserted each picture (drag n drop) into a blank slide.

Want to use the "Big Screen Book" with audio? Rip the CD or Record your own voice.
Many of these books come with an audio CD so you can insert the .mp3 file into your PowerPoint  and have it read the book.

Because I am going to put these files onto iPod Nanos eventually,  I imported them into iTunes:
1 - First, I went to iTunes > Preferences and made sure that my import settings were set to import audio files as .mp3. I also set my import settings to Show CD. This allows me to just import one file - the file with the prompt to turn pages.


2 - I inserted my audio CD and selected the audio file I wanted to import and chose Import CD. It is pretty easy to tell which file you want to select; it either says with prompts or is longer (more minutes) than the other files. Because I only selected the audio file with the turn prompts, I will only get that file imported.


3 - From inside my PPT file, I selected to insert the .mp3 file by going to Insert > Audio > Audio From File... Then I navigated to my .mp3 file. You can find these in your iTunes music library. They are usually in a folder with the Author's name.


Make sure you select "Play Across Slides" in your Action Ribbon so that the audio file will continue to play when you "turn the pages."


 COPYRIGHT NOTE: I am not in violation of copyright laws as long as I don't publish or distribute my book presentation. This is staying in my classroom.


I use the white remote that came with my computer to advance the slides (you might have the new, silver one). That way I don't have to be right at my computer when it is time to turn the page. You could also let the students use the remote. Even if they are not reading yet, most audio files have a prompt sound to turn the page.

I would recommend using interactive software (MimioNotebook, SmartNotebook) if you want to create some interactivity with these images. It could be a lot of fun and helpful to create sound files for the objects in the story. For example if a student clicked on a picture of a bus, they could hear the word bus; maybe see the word appear too. Wow! I just got an idea for my next blog post!

Jun 28, 2013

Where does your spending money go?? Mine goes to gadgets!

Where does your spending money go?? Mine goes to gadgets! AND, I think some of these are going to be a teacher's dream!

The first item I purchased was the miim Samsung Chromebook 11.6 Inch Slim Shoulder Bag. I have a carry case for my laptop (Macbook Pro 15 inch), but it is just too big if I only want to tote my ChromeBook (CB)...and maybe my iPad and iPhone. I love it because it is adequately padded, has two compartments to keep my iPad and CB separately padded, and has several pockets for smaller gadgets. It has a nice zipper top and velcro closures for the side pockets. It also comes with a shoulder strap to carry like a messenger bag. I would have to say the only down side I see so far is it took over a week to get here. It cost me $26.99 on Amazon and I have a feeling it will earn that money back in no time!
miim with the shoulder strap
plenty of room for other gadgets and cables


The second item I bought was the nootle iPad Tripod Mount by grifiti.  This bad boy will be going with me into classrooms! It is basically just an iPad protector with a mount attached so you can screw it onto any conventional tripod. Think of how much easier it will be to take pictures and video with your iPad attached to a tripod! grifiti also sells the dootle, which is a combination iPad holder and notepad holder. It just makes sense then that they would also make the TAGTool Stylus. This is a stylus and writing instrument in one. I don't have either of these items...maybe for Christmas.
I paid $16.98 on Amazon for my nootle.
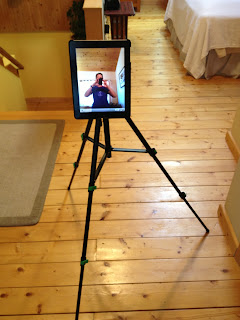
That's me taking a picture of the setup
this is what it looks like from the back


The third, and coolest gadget I bought is a Maxell Airstash with 16GB SD card! I am so excited to use this next school year with my teachers that have multiple iPads or other devices. So what is it, you might be asking?? (I hope you are) This little guy, smaller than a pack of gum, is a wireless storage device. It allows you to store videos, photos, and documents. But that's not all...you can share stuff (not apps) between devices, even if the devices don't have any accounts in common! The first thing I did when I got it was put a video and a Google Presentation on it. Then, I grabbed Mike and made him a geek for a few minutes (that's all he can stand). We were both able to watch the video (not simultaneously...we started it at different times) and were able to open the Google Presentation!

I had this device up and running in about a minute. I haven't pulled out the little manual yet! It is so simple; turn it on, go to your settings on your device and connect to it (AirStash), press your home button and launch the AirStash+ app (FREE). Well...there is a little bit more to it...read on...

The AirStash has a USB connection to connect to your computer and a slot to insert an SD storage card. When you connect it to your computer, it is like a flash drive. You can store music, videos, photos, and files on it. I put a video (6.4 MB QuickTime file), two songs (1 .mp3 I ripped from a CD and 1 .m4a I bought on iTunes) and a Google Presentation.

Once you have the files on it, you unplug it from your computer. Then from any device that you want to use it with, you use the AirStash+ app to get to the files. The video and music stream so you don't take up any room on your device (LOVE IT).  For photos, you import from the AirStash or export to the AirStash. What a beautiful way to share photos out to multiple devices, or collect from multiple devices (Teachers, are you listening?)

My iPhone and iPad connected. It looks the same on both

Here I am streaming a video to both my iPhone and iPad


When you launch the AirStash+ app, it appears like any storage device and you can create folders to organize your content. When you want to open a document that is stored on the AirStash, just tap it from the list. When I tapped on my Google Presentation, a message popped up that told me my device might not be able to read the file, and asked me to download it (so files are transferred to your device). Dropbox, Google Drive, Bump, Evernote, email and copy were the options for using the file for me on my iPhone. I had more choices on my iPad because I have more apps there.

You can use up to 128GB SD cards to expand your storage, share files with up to 8 devices and share movies with up to 3 devices simultaneously. You charge it by plugging it into your computer so there is no need to carry extra batteries with you. I haven't read to see if you can charge it with an outlet plug.

One thing you have to be aware of is when you are connecting to the AirStash, you are using your wi-fi connection, so you lose Internet. You just need to either turn off the AirStash or switch wi-fi options in settings to get back on the Internet. I bought this for $139.70 on Amazon.

I will be bringing this (and all my other gadgets) to the 2013 MCCE Summer Tech Summit in August so be sure to find me and we can share summer pictures! I will have had time to play with them all by then and hopefully will have a massive amount of ideas for uses. I am hoping you already have ideas forming!

May 28, 2013

Newest Web Apps to Watch...

From Meg Westbury:  
This was a presentation for 2013 for students and staff of the Cambridge Judge Business School.

May 22, 2013

Teachers - digitize those old cassettes! It's easier than you think!


I often hear teachers lament about the lose of a great resource...the cassette tape player. Every primary teacher I know has at least 100 books with cassette tapes for audio support. They know how valuable it is to have the book read to the student as they follow along!

Well, don't throw those tapes out just yet; at least not until you have digitized them. Don't know how? Well here is an easy and inexpensive way to get those tapes converted to .mp3 files (I am using a Mac, but it works on Windows too).

Step 1: Gather your hardware

  1. You will need a tape player with a headphone jack
  2. A computer with a mic port - I am using my MacBook Pro 
  3. An audio cable - 3.5mm jack on each end. You can get one for under $5 at Walmart.
  4. (optional) I like to hook my speakers up on my computer to hear what I am playing. 

Step 2: Select Software for Recording

I like to use Audacity because I can then adjust my audio file with filters if necessary. This is nice if you have a noisy tape player...you can take out the annoying background noise.

  1. Download the free program Audacity
  2. Download the Lame Lib plugin - this allows you to convert your file to .mp3 file format.
  3. Open the disk images if necessary. Drag the Audacity folder to your Applications folder on your hard drive. Then, drag the Lame Lib plugin (libmp3lame.dylib) into the "plugins" folder inside the Audacity folder.

Step 3: Set up your System for Recording

  1. Plug in your audio jack. One end goes into the headphone port on your cassette player. The other end goes into your line-in (mic) port on your computer. This port is beside your headphone port. 
  2. Set Sound input and output in System Preferences. Audio input should be set to line-in and output should be set to either internal speakers...or if you have plugged in USB speakers, choose USB (they will show up in the preferences window if you have them plugged in)      


Step 4: Set up Software for  Recording

  1. Set Sound Preferences in Audacity. Launch Audacity then go to Audacity - Preferences. Change the following:
    1. Under Devices, set your playback and recording to match your input/output preferences.
    2. Under Recording, set your playback to be through both hardware and software.


Step 5: Digitize your Cassette

  1. Insert your cassette tape into the player
  2. Click Play on your tape and Record in Audacity   
  3. You will be able to hear the recording...click Stop when the audio is done.
  4. Convert your file to .mp3 format - Go to File -  Export and choose mp3 from the File Format drop-down menu
  5. Choose your location on your hard drive.
  6. Click Save

You Are Done! Well...you might want to put these files into your iTunes account. Then you can transfer them to an .mp3 player or other device (ipod, ipad). That way, you can have your students use that device to listen to their books instead of the old tape player, AND...you have a backup on your computer!