I often hear teachers lament about the lose of a great resource...the cassette tape player. Every primary teacher I know has at least 100 books with cassette tapes for audio support. They know how valuable it is to have the book read to the student as they follow along!
Well, don't throw those tapes out just yet; at least not until you have digitized them. Don't know how? Well here is an easy and inexpensive way to get those tapes converted to .mp3 files (I am using a Mac, but it works on Windows too).
Step 1: Gather your hardware
- You will need a tape player with a headphone jack
- A computer with a mic port - I am using my MacBook Pro
- An audio cable - 3.5mm jack on each end. You can get one for under $5 at Walmart.
- (optional) I like to hook my speakers up on my computer to hear what I am playing.
Step 2: Select Software for Recording
I like to use Audacity because I can then adjust my audio file with filters if necessary. This is nice if you have a noisy tape player...you can take out the annoying background noise.- Download the free program Audacity
- Download the Lame Lib plugin - this allows you to convert your file to .mp3 file format.
- Open the disk images if necessary. Drag the Audacity folder to your Applications folder on your hard drive. Then, drag the Lame Lib plugin (libmp3lame.dylib) into the "plugins" folder inside the Audacity folder.
Step 3: Set up your System for Recording
- Plug in your audio jack. One end goes into the headphone port on your cassette player. The other end goes into your line-in (mic) port on your computer. This port is beside your headphone port.
- Set Sound input and output in System Preferences. Audio input should be set to line-in and output should be set to either internal speakers...or if you have plugged in USB speakers, choose USB (they will show up in the preferences window if you have them plugged in)


Step 4: Set up Software for Recording
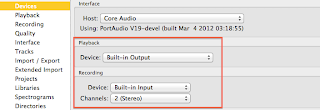
- Set Sound Preferences in Audacity. Launch Audacity then go to Audacity - Preferences. Change the following:
- Under Devices, set your playback and recording to match your input/output preferences.
- Under Recording, set your playback to be through both hardware and software.


Step 5: Digitize your Cassette
- Insert your cassette tape into the player
- Click Play on your tape and Record in Audacity
- You will be able to hear the recording...click Stop when the audio is done.
- Convert your file to .mp3 format - Go to File - Export and choose mp3 from the File Format drop-down menu
- Choose your location on your hard drive.
- Click Save
You Are Done! Well...you might want to put these files into your iTunes account. Then you can transfer them to an .mp3 player or other device (ipod, ipad). That way, you can have your students use that device to listen to their books instead of the old tape player, AND...you have a backup on your computer!


1 comment:
It is quite slick....yet I still have 100s to go. Anyone want to have a cassette converting party?! That might motivate me!
Post a Comment